

Easy and quick pizza dough recipe
We are going to take a pause from sewing and tackle a quick and easy recipe for pizza dough. Some times ordering pizza seems like a quick fix and I agree. But what if the local pizza joint is busy on a Saturday night and you are just hungry. I got the recipe for you, because like you I don’t have time to waste.
After testing out a few different types of pre made pizza dough I decided to make my own. Here are ingredients
1 cup of pizza flour I use Caputo’s 00 pizza flour. You can find these at most Italian deli markets.
1 cup of all purpose flour You can use King Arthur flour but I like to use Francine’s French flour.
1 teaspoon of sea salt
1 cup of lukewarm water. Make sure it’s lukewarm and not hot, or you will kill the yeast.
1 tablespoon of olive oil
3/4 teaspoon of active dry yeast.
Let’s talk about the flour for just a moment because I’m sure you are thinking. Why is this woman spending all this money on flour from across the pond? Well I bake a lot, and when you bake a lot you eat it. I don’t like the bloated feel that flour made in the US gives me. Some times we just can’t avoid it in some baked goods that you buy at a bakery, but for some reason the flour in Europe must be milled differently (or grown without something that we do in the US) and when I bake with this flour I don’t get that bloated feeling. So a few years ago we switched and we have all felt the difference. So that is my opinion about flour. I’m not knocking the US made flours. When that is what is available you go for it. But believe it or not, it does makes a huge difference.
Back to the recipe…
In a mixing bowl, combine the flours and salt.
In a separate bowl mix the lukewarm water, salt and active yeast with the olive oil and gently stir.
Pour the wet ingredients into the mixing bowl with the flours and salt.
Mix at a low speed with the paddle hook on for about 3 to 4 minutes until well combined. You can also do this by hand if you don’t have a mixer.
Once the dough has formed and all your ingredients are well combined then put the dough in a bowl, cover and let it rest in the fridge. I usually leave it in the fridge for an hour or you can leave it there overnight to rise.


Now its time to make pizza! This dough is enough for 1 - 16” pizza. Top it off with homemade tomato sauce, cheese along with your favorite toppings. Enjoy!
As an Amazon Associate I earn from qualifying purchases. What the heck does that mean?! It means that if you click on the links above and you make a purchase I earn a small commission from it.

Simplicity 8982 - pattern review and sew along

Pattern Description:
Knit top with gathered sleeves and larger cuffs
Pattern Sizing:
6-22. I made the size 22 on the top but used the 18 cuff size as I wanted them tighter around my wrists.
Did it look like the photo/drawing on the pattern envelope once you were done sewing with it?
Yes
Were the instructions easy to follow?
Yes they were straight forward and easy to follow.
What did you particularly like or dislike about the pattern?
I like the style, it’s easy and quick. Dislikes none.
Fabric Used:
Cotton jersey in a beautiful ochre color.
Pattern alterations or any design changes you made:
Just the change in the cuffs so it was more gathered around my wrists / lower arm and lengthened the bodice about one inch.
Would you sew it again? Would you recommend it to others?
Yes I can see myself making this pattern again and again in prints and other colors.
Conclusion:
I’ve been wanting some easy basics in my winter easy to sew lineup.

Beginner’s Sewing Tools
Let me help you skip the headache of figuring out what you need as a beginner sewist. Back when I started my sewing journey I took lots of trips to the fabric store, it was a roulette game of trying to figure out what I needed as I kept working on a sewing pattern. Here are a few that are obvious and some that are not.
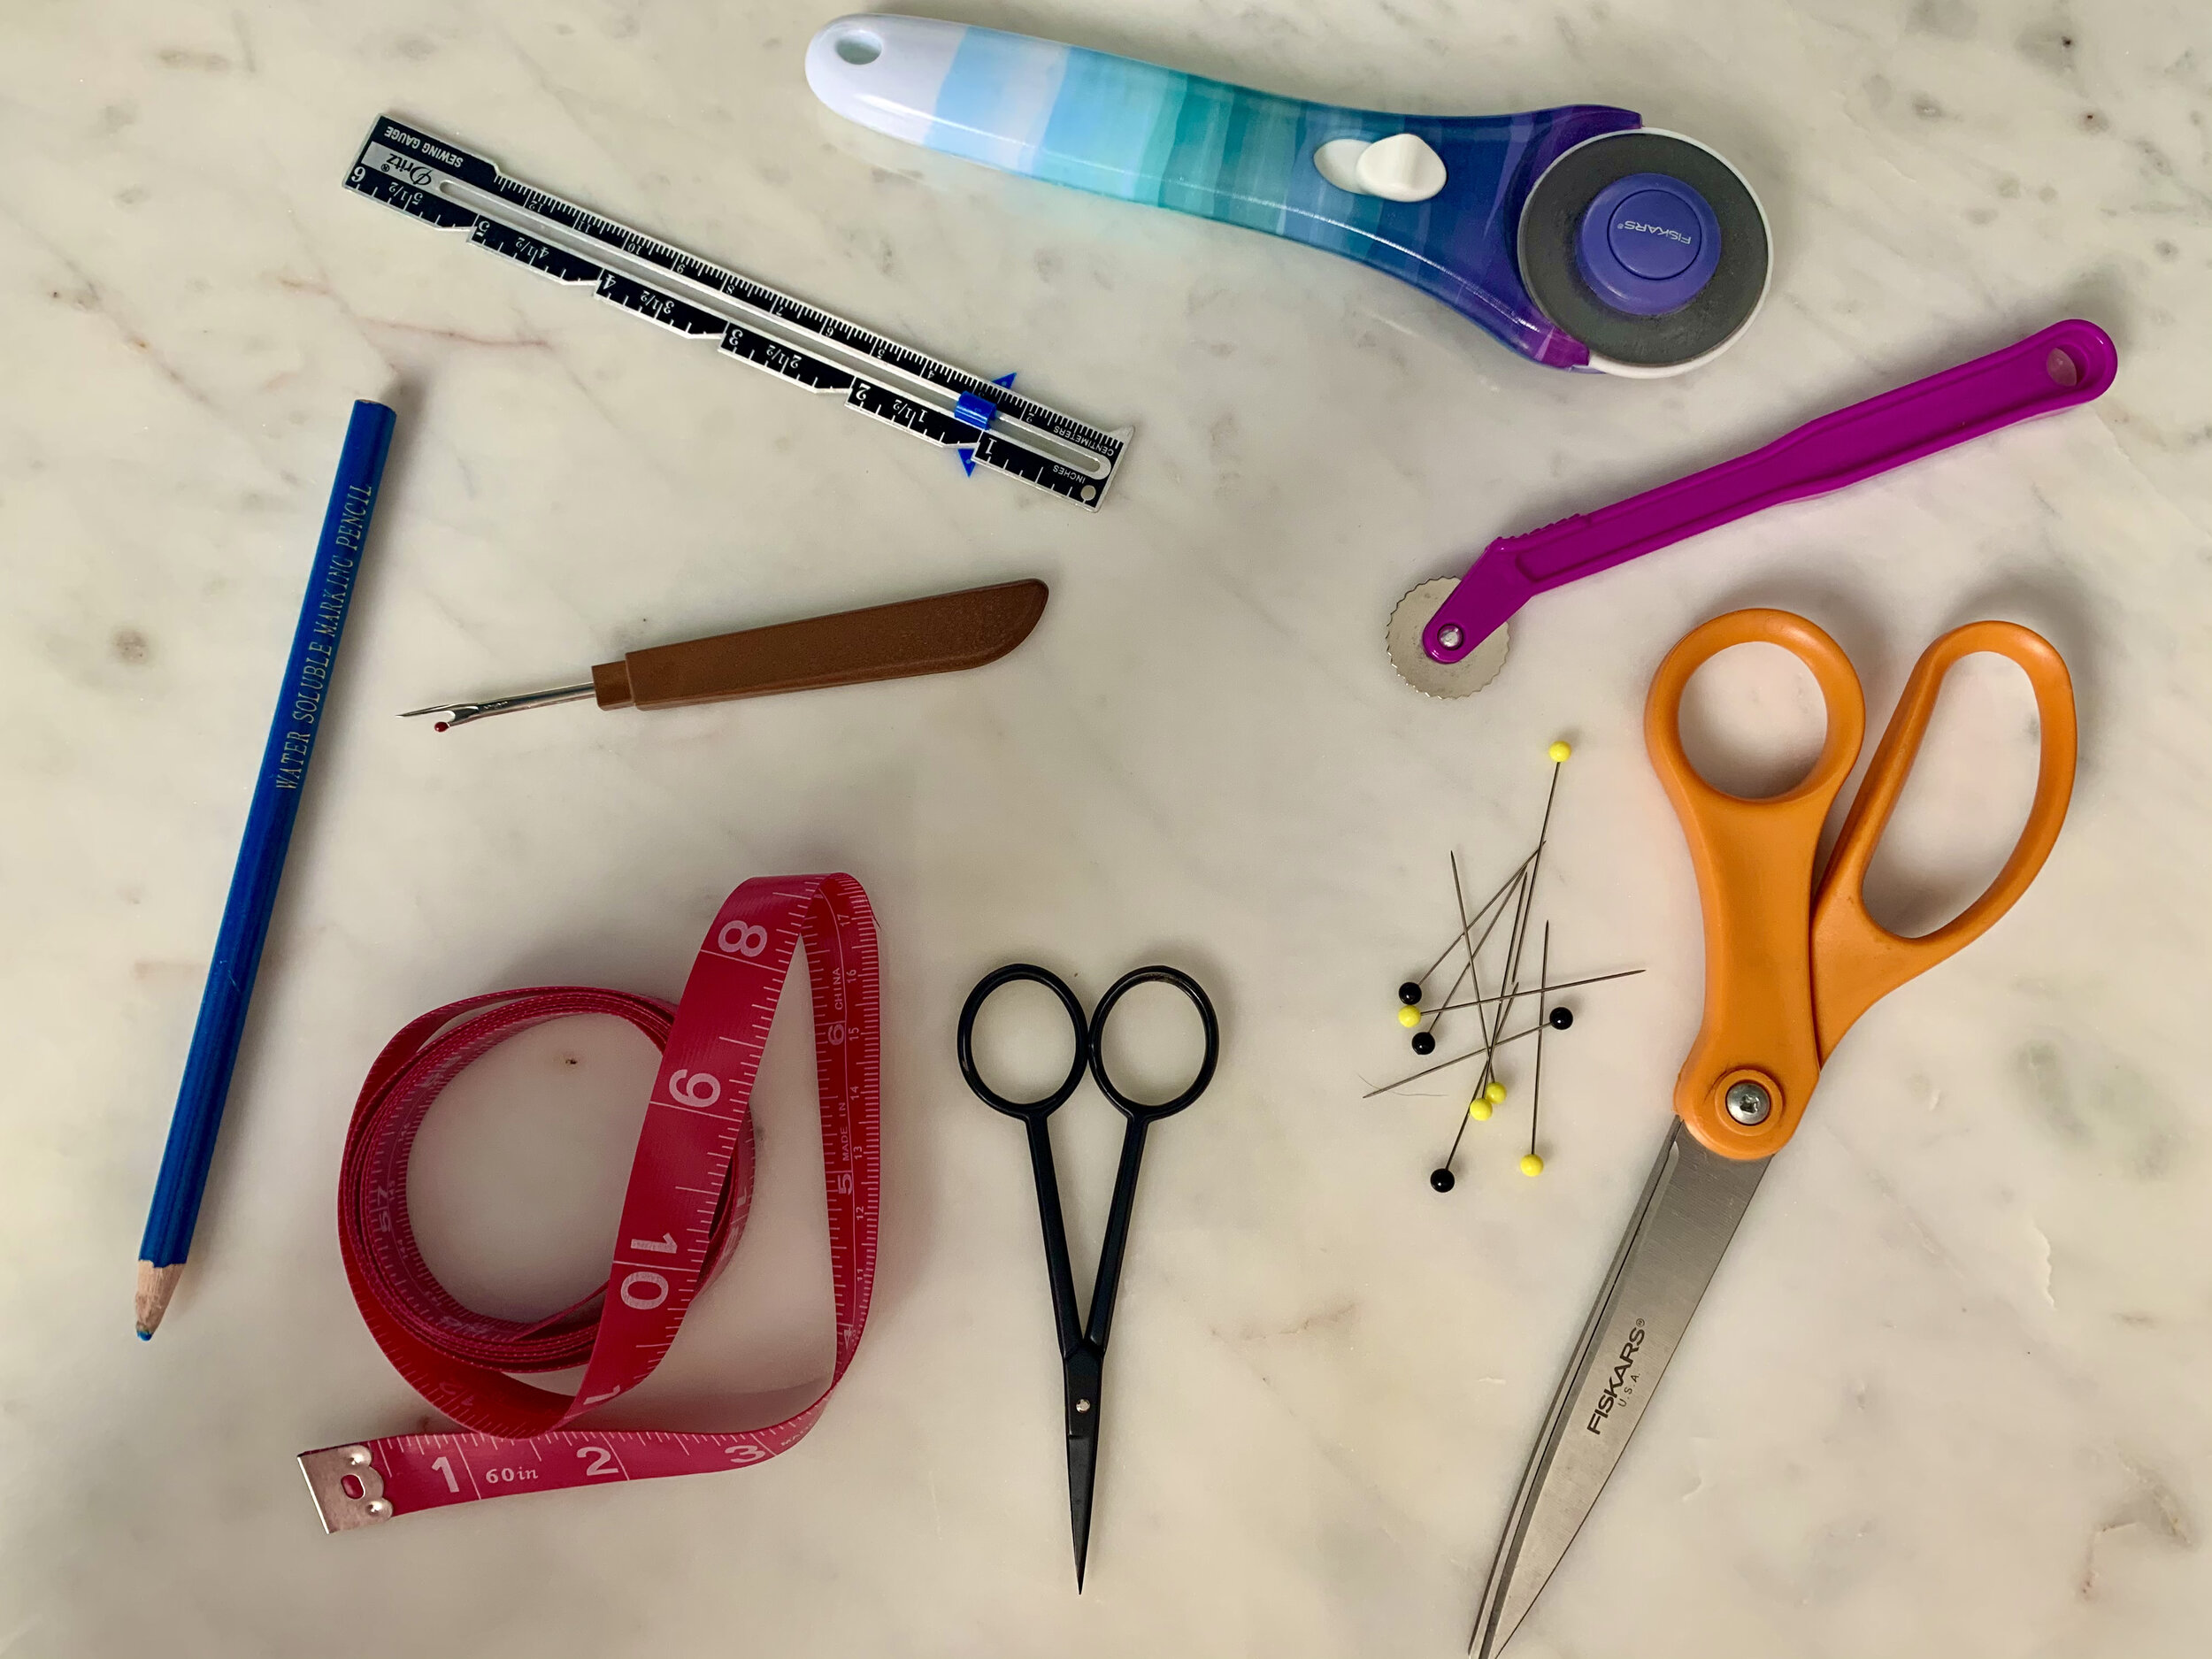
Common Sewing tools for beginners
Sharp pair of scissors - A good sharp pair of scissors will be something you will use every single time. Not only will you cut fabric but threads and such. You want to make sure you pick a pair that is used exclusively to cut fabric. Do not use them for anything else like cutting out a paper pattern because you want to make sure your scissors stay sharp. You don’t need an expensive pair of scissors, an 8” seamstress scissors will do the job. I like Fiskars 8” scissors. They are inexpensive and lightweight. If you are left-handed they also have them in stock. When the blade gets dull you can either get them sharpened but I usually just get a new pair and keep the old ones in case I need to cut thru fabrics that may dull the blade such as sequins, fur or silk.
Rotary Cutter and Cutting Mat- I love scissors but I do have to say I use my rotary cutter most often as my hands don’t get tired as much as with cutting with scissors. They come in different widths I usually use a 45mm width but they are handy when you have a lot of fabric to cut. They are sharp so watch out with that blade. Use a rotary cutter with a self healing mat. I have something similar to this rotary cutter by Fiskars and I replace the blade once it gets dull.
Beginner’s Sewing Machine - You don’t need an expensive machine to learn how to sew. You just need a machine that can stitch straight, zig zag stitch, that can do a buttonhole and that can do reverse stitch so you can lock in your stitches. Janome and Brother has excellent beginner’s sewing machines. Or ask someone in your family if they have a sewing machine you can borrow. You would be surprised how just about everyone has one laying in their home that goes unused.
Measuring Tape - You will use this constantly to measure yourself, measure a pattern, measure fabric. They are sold rather inexpensively at the fabric store or online. I get mine for 0.99 cents and I replace it every year or so as plastic measuring tapes they tend to stretch over time which is not so great when you want accurate measurements.
Seam Ripper - I hate to say this but as much as you will sew seams, you will rip a fair share of them too. Most sewing machines have a little seam ripper included but I’m telling you right now its worth getting another one because you will use it. I have this beauty by Clover and my trusty seam ripper from my sewing machine. They both get some quality use.
Thread snips - Ive had my black Silhouette Studio Carta thread scissors for quite a long time and they are easy to find around my sewing space. They are used for precision cutting. Used when you want to cut some of those long threads after machine sewing or hand sewing. I keep them close to my sewing machine and I use them often. You don’t need anything this expensive there are some other great options like Fiskars Thread Snips.
Tracing Wheel and Tracing Paper - You will need this when working with sewing patterns. Some times you just don’t want to cut into that paper pattern, you will want to trace the pattern into your fabric, in comes the tracing wheel and tracing paper to get the job done.
Tailor’s Chalk or Water Solube Marking Pencil - perfect to mark notches or markings onto your fabric. After you are done you can dust it right off or it will disappear once you wash your finished garment. Make sure you test it first on a piece of scrap fabric before you use it. Some prefer tailor’s chalk and other such as myself prefer a water soluble chalk pencil.
Sewing Gauge - Perfect to measure seam allowances and make sure you are hemming dress, pants, sleeves or skirts all in the same length. I’ve had my Dritz sewing gauge for quite some time.
Hand sewing needles, thimble and glass headed pins - Inevitably every now and then you will have to hand sew seams, a thimble so you don’t puncture your fingers hand sewing some thick seams and glass headed pins so you can pin fabric together before you sew it on the sewing machine.
Iron and Ironing Board - Press those seams after you sew them each and every single time. It makes a huge difference. Make sure you can control the steam and temperature but any home iron will do. Not only useful to press those seams but also perfect to iron those wrinkled paper patter before you set them on your fabric.
So this is it, it seems like a lot but I promise you, you will use these tools all the time. There are many others such as bodkin (aka loop turner), yard stick, clear see thru ruler, French curve, bias tape maker, point turner, jean-a-ma-jig and tailor’s ham but for now those can wait. Sewing doesn’t have to be an expensive hobby. You can find many of these items at a lower price ( wait for those sales! ) or better yet try to find some of these at a thrift store.
As an Amazon Associate I earn from qualifying purchases. What the heck does that mean?! It means that if you click on the links above and you make a purchase I earn a small commission from it.

Simplicity 8912 View B

Simplicity 8912 View B
Pattern Description: I made Simplicity 8912 View B, there is a newer envelope but its the same view. It is a shirt dress, with a stand up collar and knee length.
Pattern Sizing: I made a size 22. I love the extra room especially since this will be worn in the summer.
Did it look like the photo/drawing on the pattern envelope once you were done sewing with it?Yes, its pretty darn close. I also added in a double looped belt so it looks more put together.
Are the instructions easy to follow? Yes they were pretty easy to follow. The directions for the cuffs were a little confusing but it was relatively easy once I looked at the drawing.
What did you particularly like or dislike about the pattern? I actually loved the pattern and can see myself making it a few more times.
Fabric Used: I used a lightweight white and blue stripes shirting fabric.
Pattern alterations or any design changes you made: I lowered the bust dart two inches, added one inch to the length of the bodice, and did a bicep. adjustment.
Would you sew it again? Would you recommend it to others? Yes, I would sew it again and I would recommend it to others.
Conclusion: Great pattern if you are looking for a shirt dress. No buttons or zippers.

Beginner’s Sewing Patterns
I remember when I started sewing, I picked some patterns that I believe are still sitting somewhere in the pattern stash because they looked good but were the wrong choices when I was starting out. Too fitted, zipper and buttons galore or gasp… an evening dress. Stay away from those choices when you are starting out.
Here is a list of recommended sewing patterns if you are a beginner and don’t know where to start your sewing journey. When selecting a pattern for a beginner it is important to stay away from very fitted patterns, lots and lots of pieces or patterns with a plethora of buttonholes, zippers. You want a pattern that will be quick and easy for a garment that you can wear right away.

A few of my favorite tried and true patterns for beginner’s.
Coco Top and Dress by Tilly and the Buttons - a classic top and dress with a plain or funnel neckline. Its a great pattern not only because you can make a classic top or you can also make a dress with a funnel neckline, add pockets or add in cuffs. The instructions are beautifully photographed and outlined. Its available in both a printed pattern or a PDF download. Sized 2 to 20.
Cielo Top and Dress by Closet Core Patterns (who recently changed their name from Closet Case Patterns) - a boxy tee and shift dress, but what I like about this pattern is that it has pockets or you can change the sleeves. You can make it on so many different types of fabric (I usually vote for linen), double bonus its loose fitting so fitting the pattern is not hard at all. The pattern is available both as a printed pattern or as a PDF download. However, the PDF download has a larger size range, so do keep this in mind when selecting sizes. Sized 0 to 30 on the PDF version.
Ogden Cami by True Bias - A simple blouse with straps that you can wear on its own or under a cardigan. The Ogden Cami is also provided in a larger size range separately with bust darts, great if you have a larger bust and want something a little more shapely. It is available as a PDF Download and printed pattern. Sized sized 0 to 30. I linked both styles above.
Stevie Top and Dress by Tilly and the Buttons - The Stevie pattern won an award as an “easy to follow” sewing pattern. It’s the perfect summer dress and its an easy to sew pattern with a tie on the back. Perfect for fabrics such as chambray, cotton lawn, viscose or double gauze. Available as a printed pattern or a PDF Download. Sized 2 to 20.
The following patterns are from the Big Four Pattern Companies, these are known as McCall’s, Vogue, Simplicity and Butterick. Anytime you hear “The Big 4” it means these companies.
Astrid McCall’s M8112 - Pull over shirt that can be either a short sleeve or long sleeve, Its part of McCall’s Learn how to Sew series (which has some great patterns!), Perfect for knit fabrics and it is sized from S to XXL.
M7531 - Another learn to sew pattern, this is a pull over dress, its a little more fitted but really easy to make. You learn how to set in a sleeve, how to sew a back slit and double bonus no zipper. The pattern is sized from Small to XXL. It is a printed pattern only.
Isabel McCall’s M8058 - Another great pull over knit dress with no zippers, I also love this pattern because you get to learn how to attach a neck band and it also has a V neck option. Available as a digital download or a printed pattern. Sized 6 to 22.
Jill McCall’s M8068 - Make a long or short skirt with a faced waistline and an invisible zipper. I promise you its not hard at all to insert a zipper. This pattern explains it in detail.
When it comes to beginner’s patterns set yourself up for success, make sure you pick something that you will actually wear, that is after all the ultimate reward. Wearing something that you made. A lot of these patterns have sew along videos on You Tube by fellow sewists or by the pattern designer themselves. Happy Sewing!
How to read and use a sewing pattern - Patterns 101
You want to get into sewing garments apparel? Sewing patterns is a great way to introduce yourself to the world of sewing.
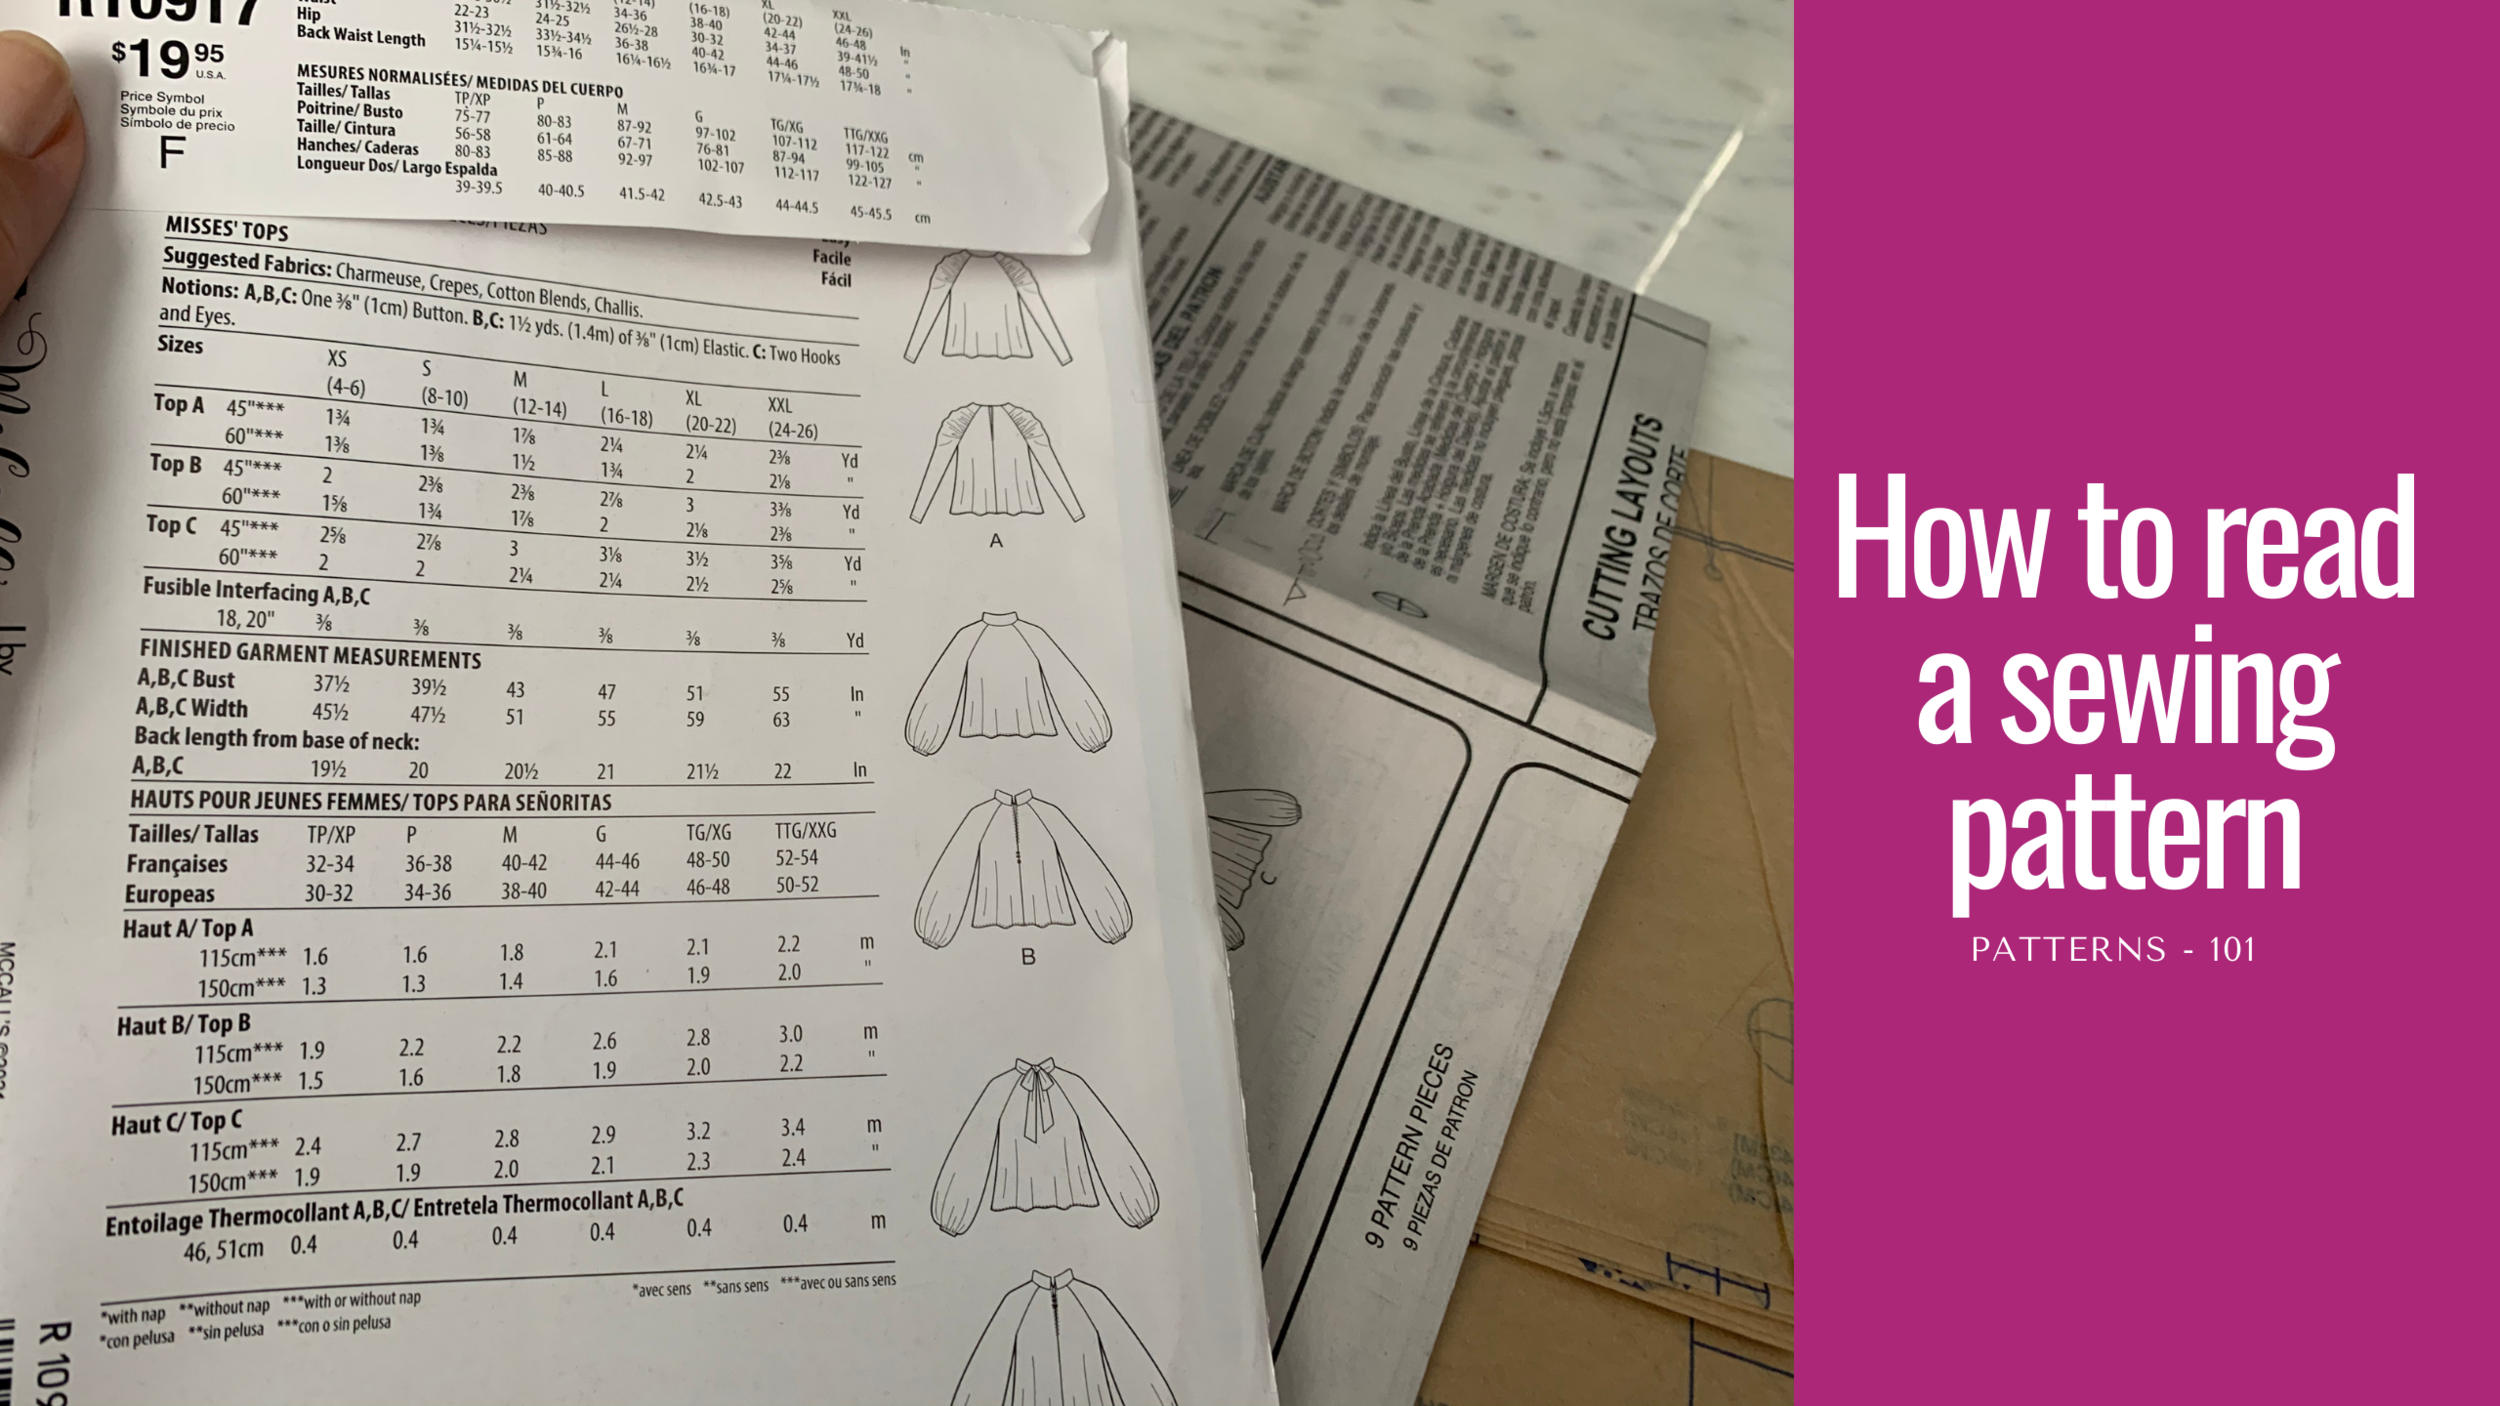
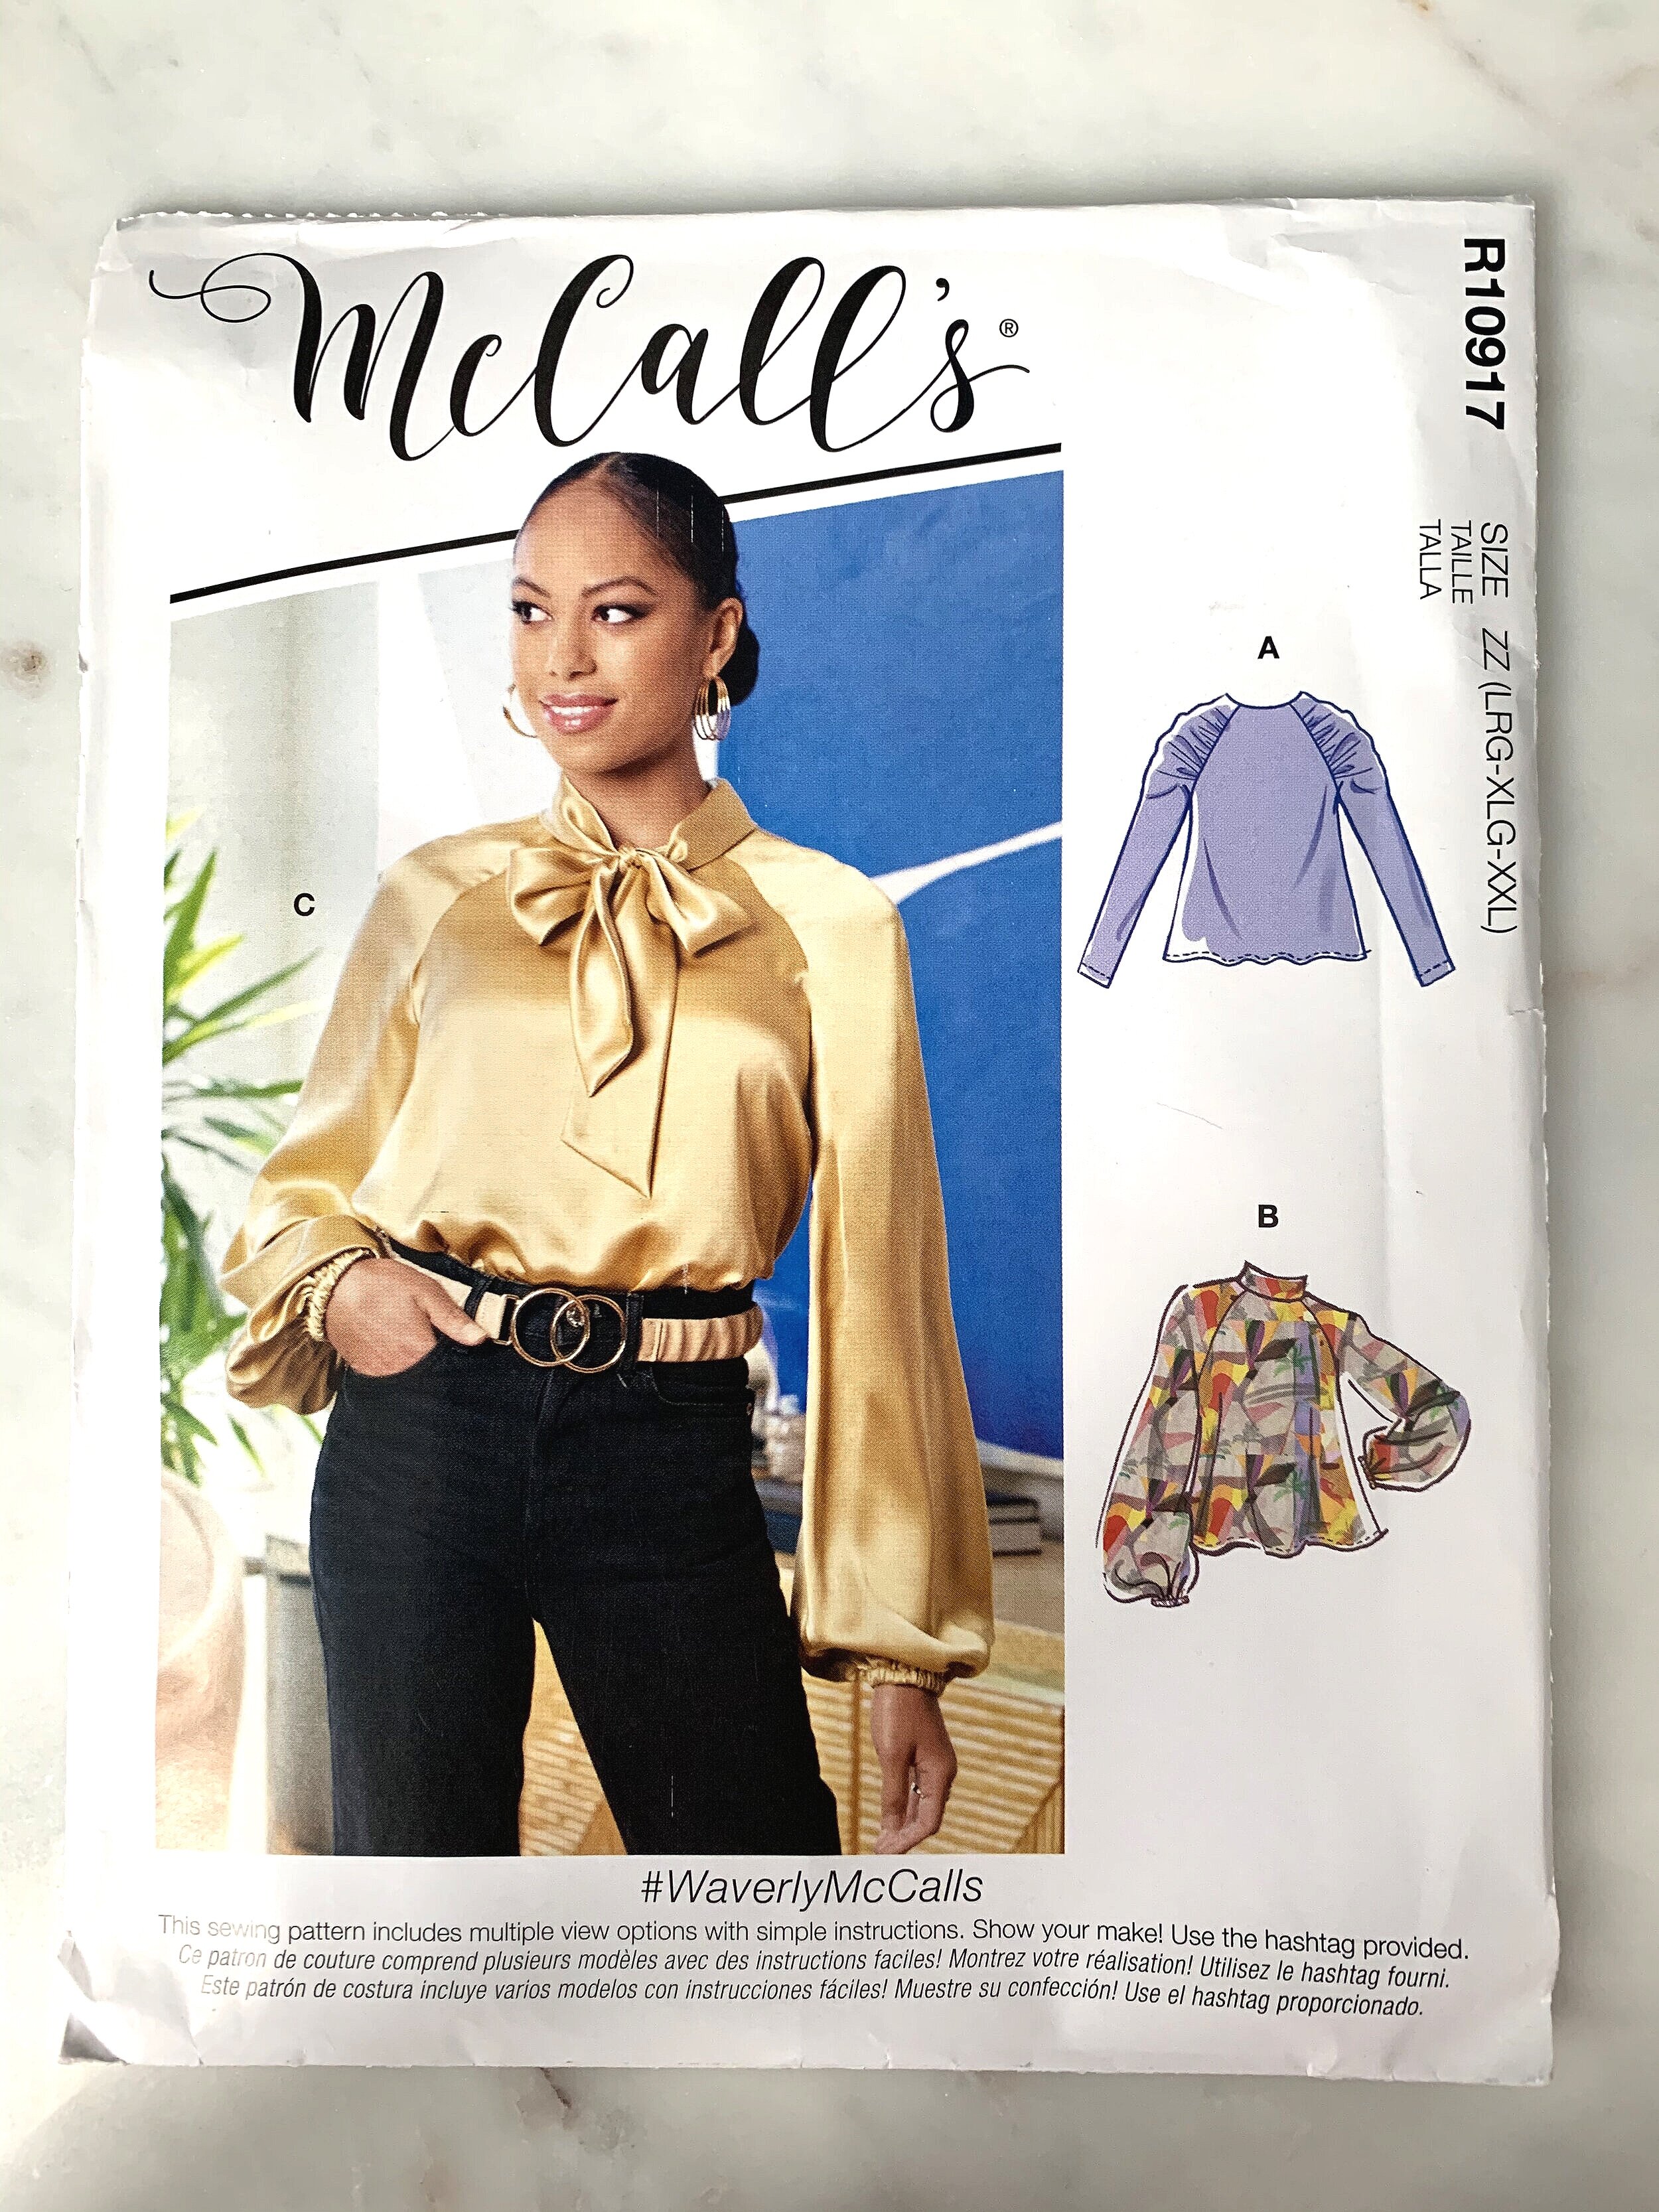
Let’s look at the pattern below from McCalls Early Spring 2021. It is sewing pattern M8147 or Waverly McCalls. The picture also has a pattern number of R10917 and that is a number pattern companies give this pattern so it is shown on a rack and it’s the first thing you see when you go to browse patterns. This pattern will be inside the pattern drawers marked as “M8147”.
Know your measurements
Before you can select a pattern, you should know your bust, waist and hip measurements (or whomever will be wearing the finished garment). The Body Measurements on the top flap have the measurements range that will fit the pattern. Since this pattern is packed in two different envelopes (XS, S, M) and (L, XL, XXL) you want to make sure you select the correct one based on your body measurements. The patterns use either inches or centimeters.
The measurements that you find in the back of a sewing pattern are not the same as ready-to-wear clothing so buyers beware you have to know your body measurements. If you are a 10 in RTW you might be a size 16 in a commercial sewing pattern. Don’t worry about the number, you want to make sure you select the correct pattern for your corresponding size. Can we just say when did RTW started with the vanity sizing?
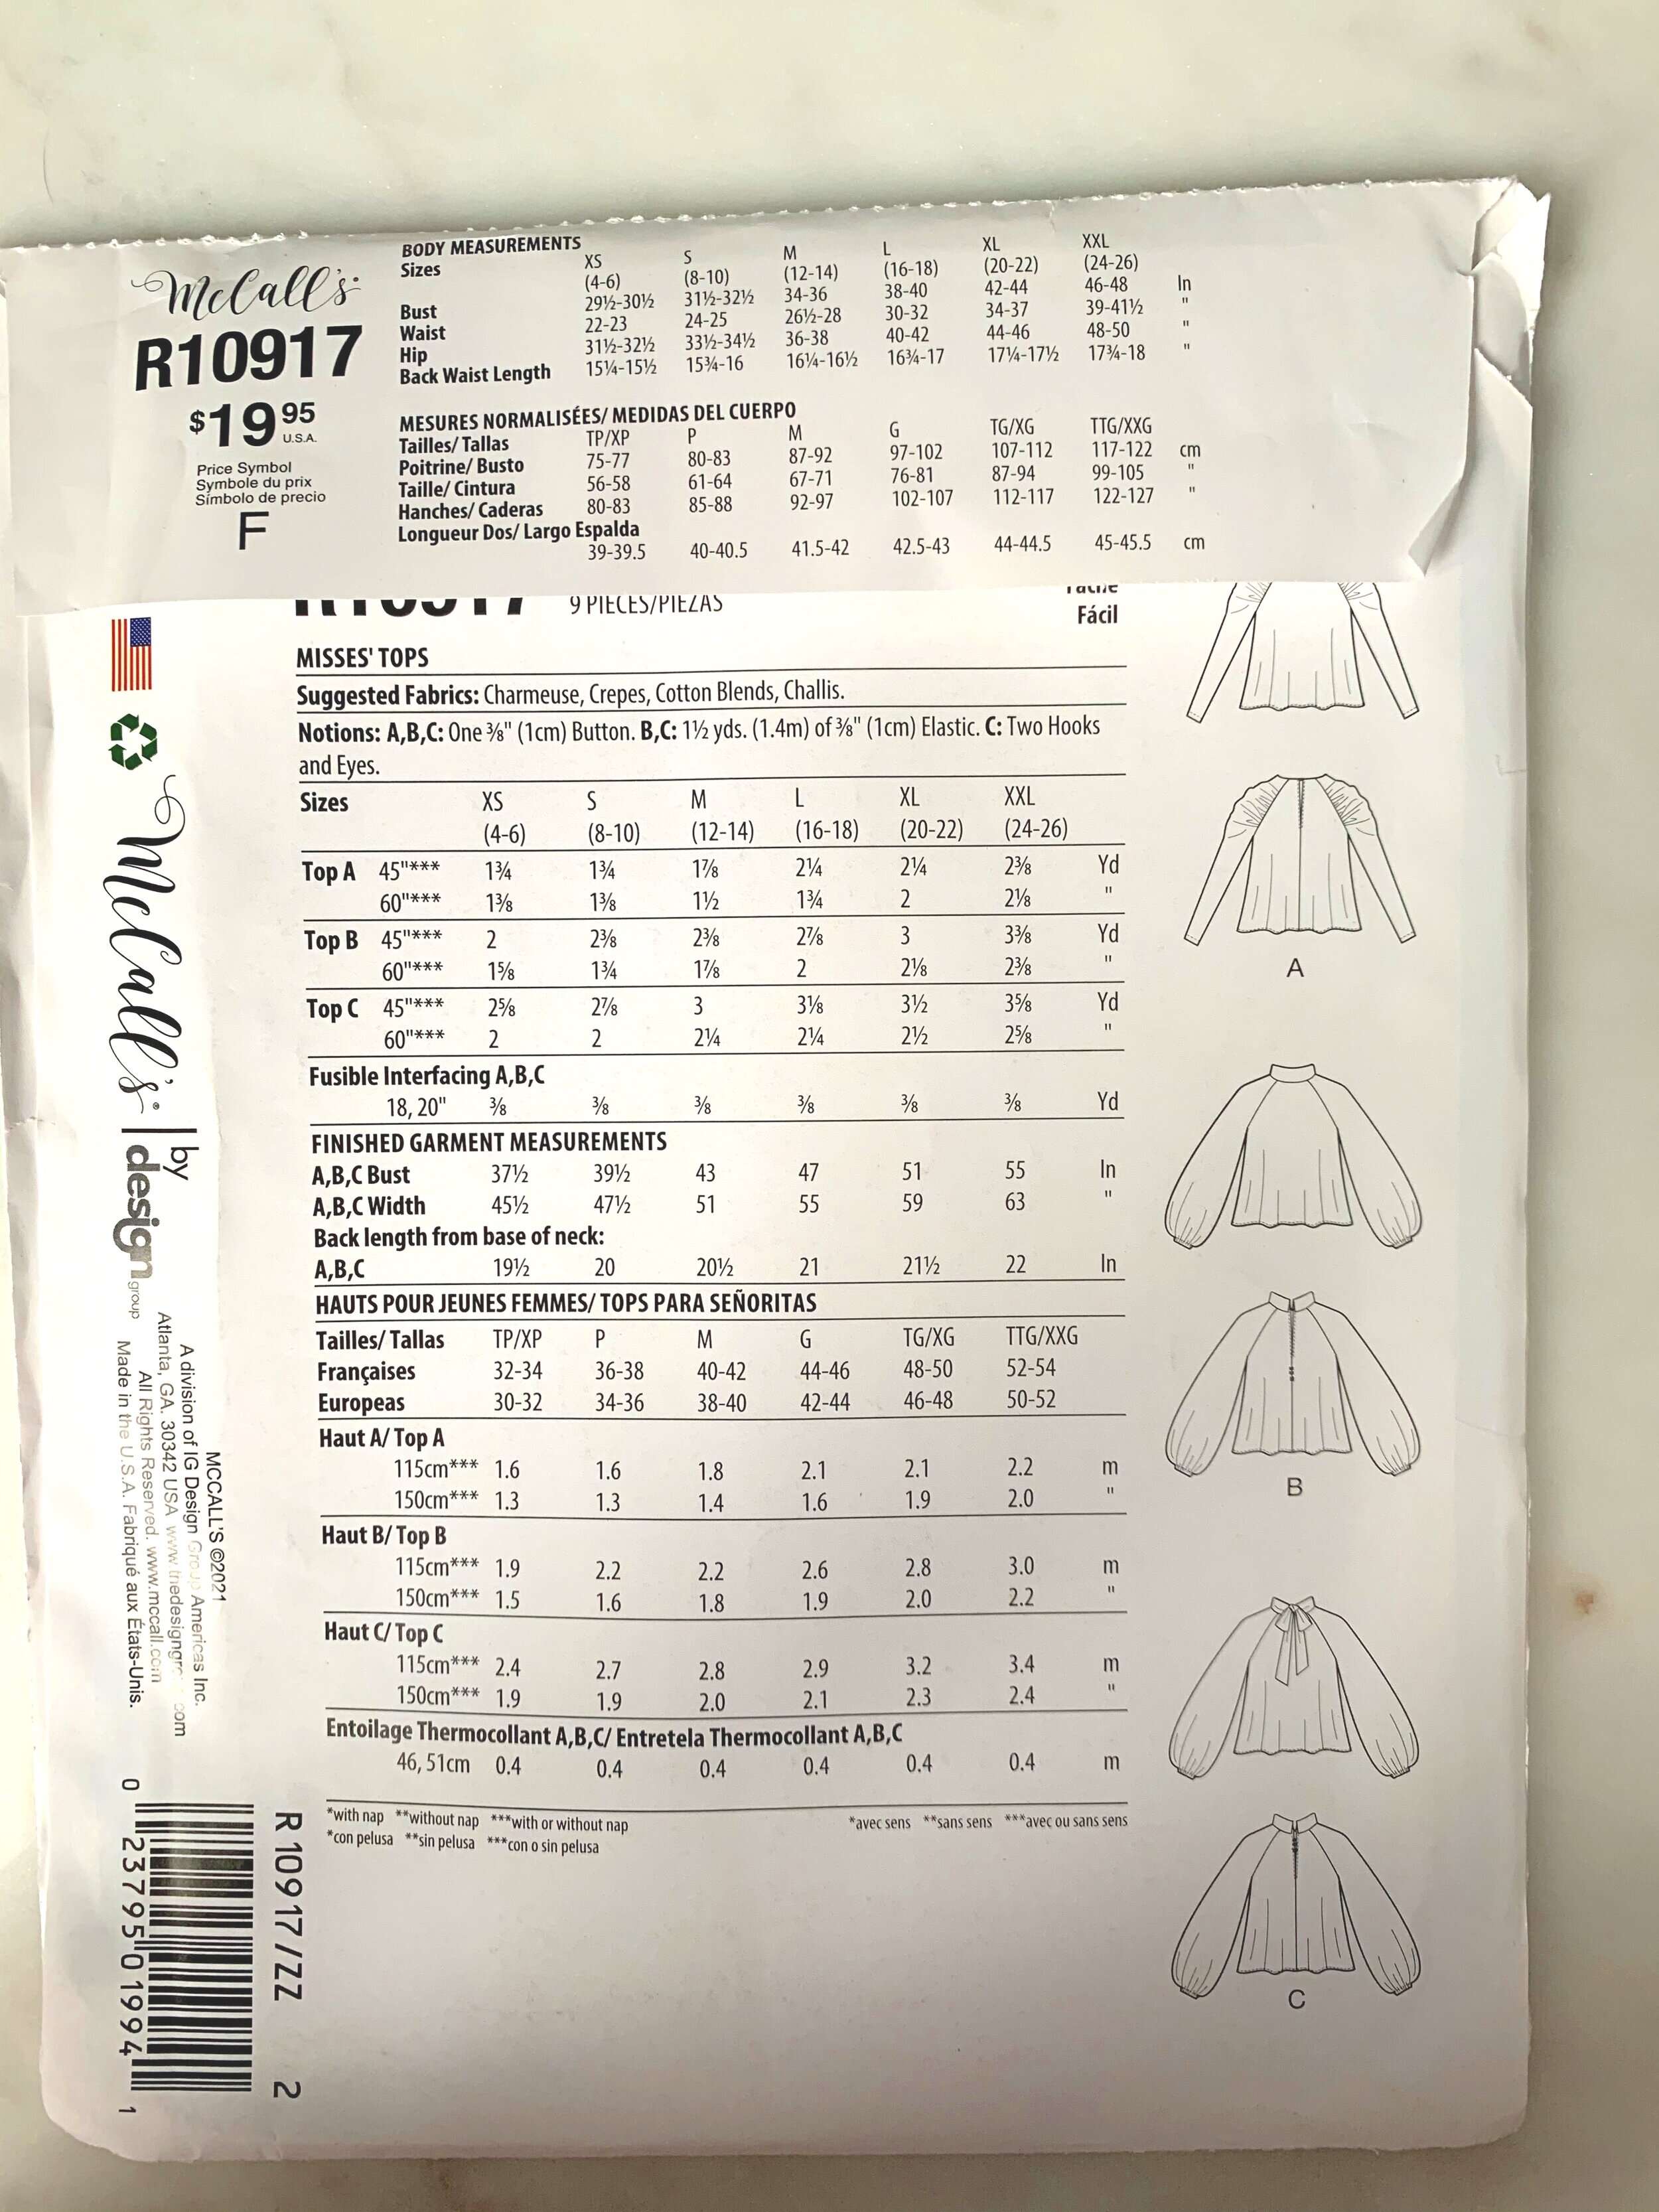
How many pieces and Sewing Rating?
For this pattern it says that you have 9 pieces and that it is rated as an easy to sew pattern. This will help you select a pattern that you are comfortable sewing and will not become overwhelming if you are a beginner.
Suggested Fabrics
Waverly McCalls has Charmeuse, Crepes, Cotton Blends and Challis as a suggested fabric. These fabrics will all have a good drape and will give you the finished garment look as its shown on the front of the envelope. If you don’t know what those fabrics feel like, ask the salesperson at your local fabric store, they should be able to point out these types of fabrics. If you are a beginner I would suggest that you try a Cotton Blend with this pattern, it will be the easiest fabric to work with while you sew with it.
Notions
The pattern lets you know what other items you will need to create this garment. For example, for View C besides fabric you will also need two hooks and eyes… Some patterns have this listed and other don’t, like this pattern but don’t leave the store without matching thread! The notions section will also tell you if you need zippers, buttons, bias tape, etc.
How much fabric will you need?
As you keep going down the pattern you will also have a chart that outlines how much fabric you will need to make this pattern. For Waverly McCalls View C it looks like you are going to need 3-1/8 yards - if the bolt of fabric is 45” OR 2-1/4 yards if the bolt of fabric is 60” so when you are at the fabric store make sure you buy enough fabric. Lately I’ve noticed that some bolts are 57” or 42” so make sure you get enough fabric. I tend to buy just a tad more (to be safe!) sometimes a 1/4 yard or perhaps 1/2 yard extra.
If you keep reading it looks like you will also need fusible interfacing…. 3/8 of a yard. So make sure you have enough because you will need it to interface pattern pieces like collars or cuffs.
Finished Garment Measurements
We had body measurements and now finished garment measurements? What’s the difference? Well body measurements is the measurement that the pattern designer created so for your body measurement it fits with the intended fit (some are more loose and others are more fitted). So finished garment measurement means that when your garment is finished the large size will have a bust measurement of 47 inches. If you like your clothing to be more fitted or looser this is the place to look because it will be the difference between a garment that is perhaps too big or too small. If the finished garment measurements are not printed in the outer envelope they will be marked on the pattern tissue itself.
Later this week we will open up the envelope and dive into the instruction and the tissue paper pattern!

Working with Knit Fabrics

If you are working with knits there are a few things to keep in mind. Here are some tips and tools to help you tackle working with knit fabrics and set yourself up for success and avoid frustrations.
Walking Presser Foot
This presser foot is a game changer, life changer whatever you want to call it, but it makes sewing with knit fabrics so much easier as it helps to feed the fabric on your sewing machine from the top, whilst your sewing machine helps it feed it from the bottom. Cue the angels music! Knits stretch and when you are sewing with them with a regular foot they will stretch but this presser foot helps. Check your sewing manufacturer for their recommendations but here is a walking foot link for the one in the video.
Sewing Needles
Use the right sewing needles for the fabric that you are sewing. Not only is it important that you use the correct sewing machine needle for the fabric you are using but also that you also change them after sewing with them. Machine needles get dull over time with usage, so not only use the right needle for the fabric but after a while, change it too. Sewing needles break and the last thing you want is a sharp broken needle tip near your face or your eyes. So change those needles!
For knit fabrics we recommend either Jersey needles (aka ballpoint needles), Stretch needles or Universal sewing needles. It also depends if you are sewing with lightweight fabrics, mid weight to heavier knits. Schmetz has a great Schmetz Needles app you can download, Look for the fabric you are sewing and they give you the size of the needle to use. It doesn’t get any easier than that.
Straight or Zig Zag stitch?
You want to use a zig zag stitch when you are working with knits. Why? Well knits stretch and if you use a straight stitch eventually your stitches will break. Bummer! In the video I explain when you can use a straight stitch when working with knits BUT if you are new and when in doubt just use a zig zag stitch that is between 2.5 to 3mm long.
Finishing your Raw Edges and Seam allowances
The good news is that knits do not unravel like a woven fabric would, which means you don’t have to finish your seam allowances. But if you are like me and like to see a finished seams to your garment then you can either use a set of pinking shears to trim your seam allowances. Another option is to trim and use a zig zag stitch to finish your seam allowances. Last but not least you can also use a serger (or overlocker) to trim and serge your seam allowances. It requires a different machine, you don’t need one but if you can invest in one I highly recommend that you do.
Do you want to learn more about sewing with knit fabrics? I highly recommend a book by Tilly Wallnes called “Stretch - Make Yourself Comfortable Sewing with Knit Fabrics” It has lots of tips, illustrations and knit fabric patterns.
As an Amazon Associate I earn from qualifying purchases. What the heck does that mean?! It means that if you click on the links above and you make a purchase I earn a small commission from it.

Pumpkin Pie with a Puerto Rican twist
The leaves are changing, and it is without a doubt fall weather. Put your summer pies to bed because it’s time to crack those cans of pumpkin puree open. Pumpkin pie is a huge hit at our house, and I mean big hit. It warms up the house, it makes everything smell amazing, and at the end you get a slice of pumpkin pie.
So here is my famous pumpkin recipe. I’ve always felt it has a Puerto Rican twist because I forgo the sugar and just go straight for the sweetened condensed milk.
Pie Crust enough for a pie dish.
1 -15 ounce can of pumpkin puree. I love Libby’s 100% pumpkin puree. You can also make pumpkin puree from scratch but Libby makes a great product so that’s what I like to use.
2 large eggs
1 can of sweetened condensed milk
1 tsp of ground cinnamon
1/4 tsp of nutmeg
1/4 tsp of allspice
In lieu of all these spices you can also use Pumpkin Pie Spice (its a combination of all of them), I use McCormick spices but you can use any brand.
In a separate bowl mix of all the ingredients until they are well mixed. Pour in a 9” pie baking dish with an uncooked pie crust.
Bake for 50 to 60 minutes or until a toothpick comes out clean.
Let the pie cool down and serve with a dollop of whip cream, If you like to kick it up a notch add 1/2 tsp of dulce the leche along with that dollop of whip cream! It’s absolutely delicious.

As an Amazon Associate I earn from qualifying purchases. What the heck does that mean?! It means that if you click on the links above and you make a purchase I earn a small commission from it.

Homemade Tomato Sauce
There is no denying that it is fall, Warm sunny days and cool nights, its my favorite time of the year and we get to enjoy those beautiful fall days. With that my tomato plants are as I like to say “on fire” and they are pumping so many tomatoes that I can’t keep up. So what to do with the plethora of tomatoes that I have? Tomato sauce!
I have a mix of cherry tomatoes, heirloom, tomatoes and beefsteak tomatoes! The hubby went overboard planting tomato plants and well, here I am ready to make tomato sauce that I can store and use later on. Its great to use on homemade pizza, or a simple pasta dish the kids can enjoy when I don’t have time to create a full blown meal.
Ingredients
Tomatoes - I have a mix of tomatoes but you can use any kind at hand. For this recipe I’m using around 1 pound of tomatoes. Make sure to wash your tomatoes!
4 Garlic cloves- minced
1 tsp - Italian Seasonings
1 tsp - Red Pepper Flakes
1 tbsp - Olive oil
Salt and pepper to taste
Cut up all the tomatoes in smaller 1 inch pieces. In a skillet heat up the minced garlic and olive oil until it barely starts browning, add all the ingredients along with salt and pepper to taste.

Whole tomatoes on a skillet
On medium heat, let the tomatoes and seasonings mixture cook for the 30 to 35 minutes until the sauce reduces. Gently smash any cherry tomatoes so they release all the tomato juice. The mixture will reduce over time and the water from the tomatoes will evaporate and you will have a thicker sauce consistency.

Once the sauce is done, take it off the heat and now its ready to use. I usually save it for later, so I save it on ball jars. I fill the jars while the sauce is still hot, leave a 1/2” gap at the top and close them with the lids. I leave it on the countertop to cool off, once the happens the jar seals itself. I keep my sauce refrigerated because we tend to use it throughout the week!

Fill it up and I leave about 1/2” gap from the top.
Voila! Its ready to use!

See the top of the jar? It sealed itself as it cooled off.
Do you can any fruits or vegetables that grow in your home? Tell me about it in the comments.
As an Amazon Associate I earn from qualifying purchases. What the heck does that mean?! It means that if you click on the links above and you make a purchase I earn a small commission from it.
Masson… a builder of many things.
It is in those quiet times when you get inspired to write and adversity makes you think of what is truly important in life. Hence why the name Masson Lifestyle. This blog is about the life I’ve built with my family in our modest home. A place were we cook, laugh, live and enjoy being together. We still have so much to renovate in this house, and after ten years of living in it, it still needs a little “reno” love. So let me walk you thru it as we update this home, where we cook, sew and also were we design a life well lived.

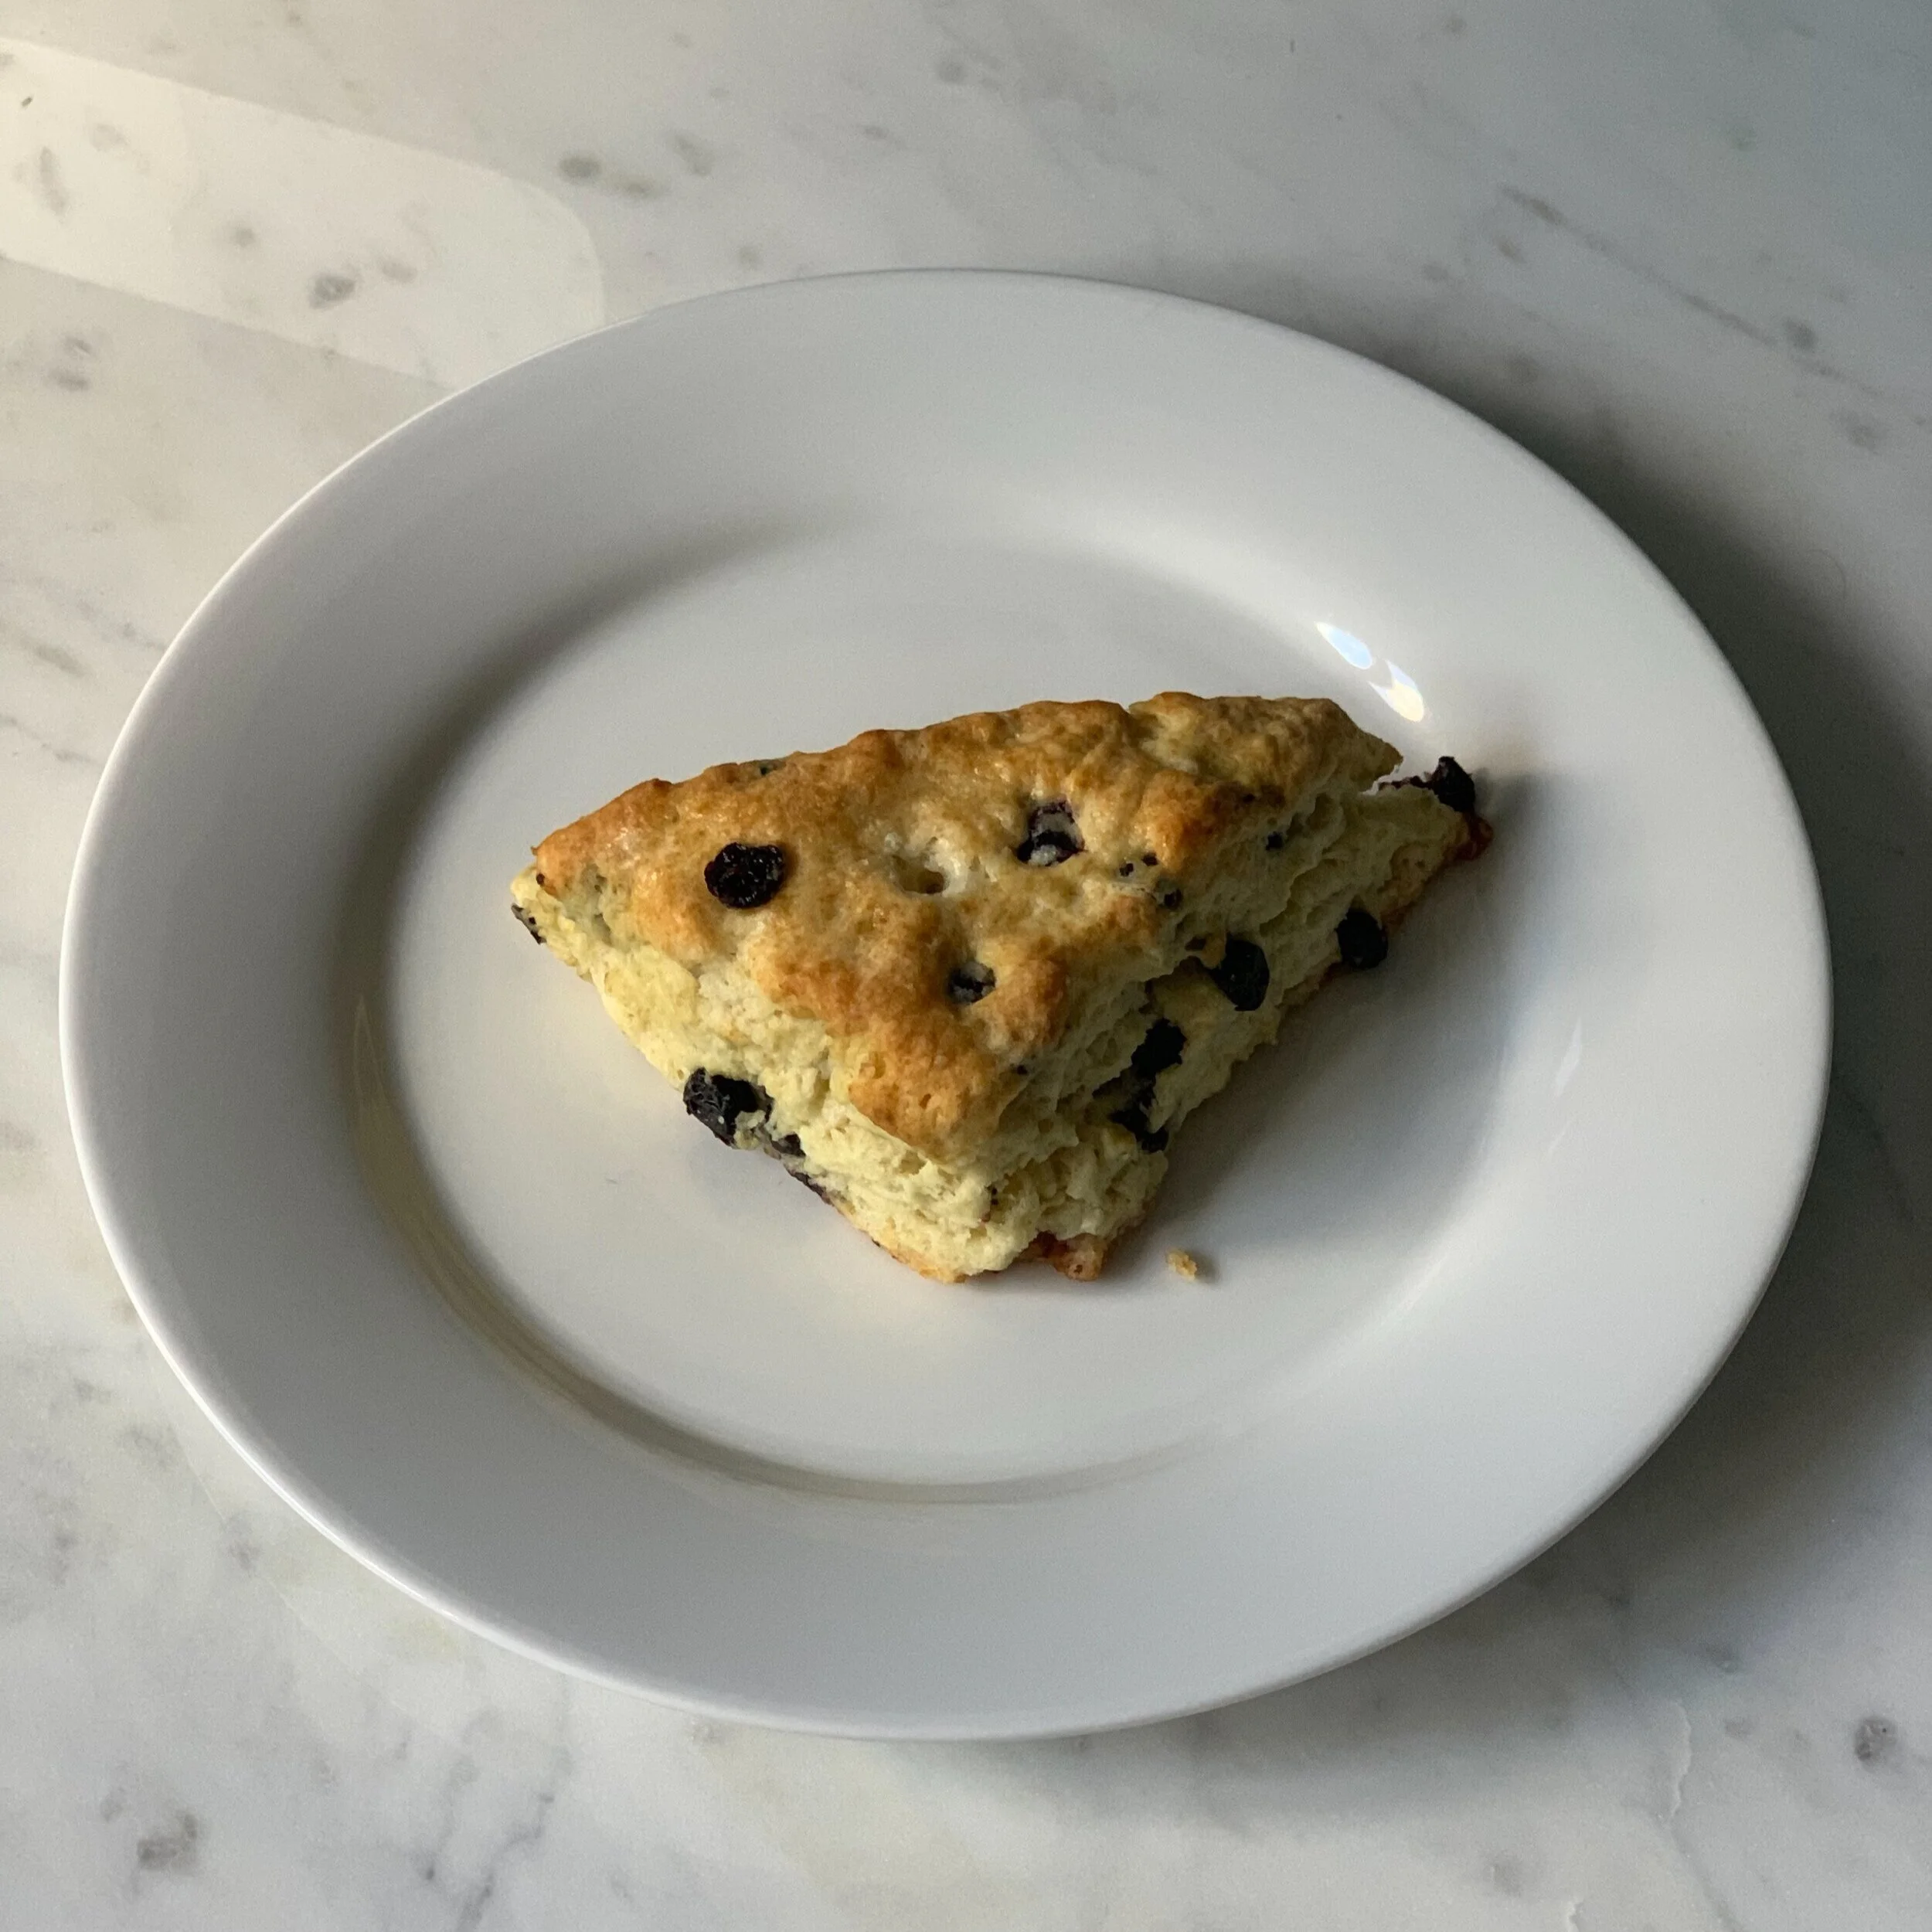
Blueberry Scones
A quick breakfast scone recipe to make ahead of time and enjoy during the week.
I don’t know about you, but I rather get in some extra sleep than cook a full blown breakfast before I have to jet out the door. I want to make sure the kids get some sort of food before they head to school and I need to eat something before I get a workout. We have made these countless of times. It’s a quick and easy breakfast to make at home. You can store it for a few days (2 to 3 days tops!) or enjoy it all at once.
2 cups of all purpose flour
2 tablespoons of baking powder
1 1/2 sticks of cold butter , 1/2-inch diced. I highly recommend Plugra butter. It has a higher fat content which means you get more flavor.
1/2 cup of dried blueberries, I get mine at Trader Joe’s. If you don’t care for blueberries you can substitute with one cup of semi- sweet chocolate chips
2 eggs
1/2 cup of cold heavy cream
1/2 tsp of salt
Preheat the oven to 400 degrees and get a baking sheet off to the side to set your scones once they are made. You don’t need to grease the baking sheet!
In the bowl of an electric mixer coming the flour, baking powder, salt, blueberries, and cold butter.

Add all the dried ingredients to the mixer
On a separate bowl, mix the eggs and the cold whipping cream. With the mixer on low speed add in the mixture of eggs and heavy cream. Mix until its just blended. You want to keep some of those butter chunks in there. Save at least a tablespoon of the wet ingredients, you will need it for an egg wash and I’m warning you now…the dough will be a little sticky.

Dump the mixture in a lightly floured wooden board. Roll the dough until its between 3/4” to 1” thick. I usually create one big rectangle with the dough and cut the dough into triangles and set on the baking sheet. Brush the top with an egg wash and sprinkle a little sugar.

Dough flattened to 1/2” thick rectangle, Cut into 12 triangles.

Brush your triangle pieces with a little bit of egg wash.
Bake for 14 to 18 minutes until the scones are lightly browned and the inside if fully baked.

Serve warm with a cup of coffee, eat by itself or add some clotted cream and jam, or save for later!
As an Amazon Associate I earn from qualifying purchases. What the heck does that mean?! It means that if you click on the links above and you make a purchase I earn a small commission from it.
Subscribe to our newsletter.
Sign up with your email address to receive news and updates.